


|
|
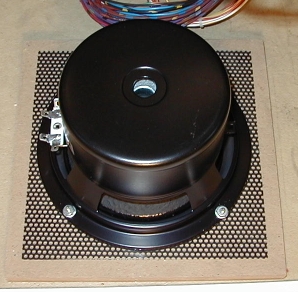
Cabinet Speaker Replacement Using a 6-1/2 Inch WooferSafety tip: Be sure to disconnect the power to the game before performing any work! You'll need to remove the playfield glass and raise the playfield to gain access to the existing cabinet speaker; don't forget to remove the pinballs before raising the playfield! Hint: In the sections below you'll need to find the center of a square. It's very easy to do this by drawing diagonal lines from each corner of the square to the opposite corner using a straight edge and a pencil. The point where the two lines intersect to form an "X" is the center of the square. Safety tip: Wear eye protection when using power tools! A dust mask will come in handy for the operations that generate lots of dust. Remove the Existing SpeakerDisconnect the black and black-yellow wires that are connected to the cabinet speaker; the wires end in quick-disconnect terminals so you can simply pull them off the speaker terminals. The speaker is held in place by four nuts; remove the nuts and washers, and then remove the old cabinet speaker and discard it. Save the nuts and washers in case you can re-use them with the woofer; ditto for the plastic speaker grille. Mounting ConsiderationsNote: On early WPC games (such as Funhouse or Harley Davidson) the cabinet speaker is mounted directly to the cabinet bottom panel; there is no separate wooden mounting block as is the case for the later games. If you're using a 6-1/2 inch woofer you probably won't need to make any changes to the existing cabinet speaker mounting arrangements; the mounting hardware for the existing 6 inch cabinet speaker lines up nicely with the mounting holes on a more conventionally sized 6-1/2 inch speaker. However, on some woofers the surround may be slightly larger in diameter than the hole in the existing cabinet speaker mounting block (5-5/8 inch), the surround may project beyond the mounting plane of the speaker, or (on early WPC games) the speaker may be mounted directly to the cabinet bottom panel. In these cases the surround and speaker cone will not be able to move freely due to interference with the mounting block or speaker grille, so you'll need to use a spacer between the speaker and the speaker grille to provide clearance for the surround. Also note that the speaker screws on the existing mounting block may be too short to fit far enough through the woofer frame to hold a nut - particularly if you have to use a spacer. If this happens you'll need to work out some other mounting arrangement, such as replacing the speaker screws with longer ones or mounting the speaker directly to the cabinet bottom panel using T-nuts and machine screws. That issue will be addressed in a future edition of this guide. Reinforce the Existing Mounting BlockBefore you install the woofer you should consider adding 3/4 or 7/8 inch long flat head #8 wood screws at the corners of the existing mounting block (if present) into the cabinet bottom panel; that will help to secure the mounting block to the bottom panel. The mounting block is glued and stapled to the bottom panel, but the glue joint is fairly narrow, so the mounting block may break off when a heavier speaker is attached and you later move the game. You could also use a pair of #8-32 T-nuts and #8-32 x 3/4 flat head machine screws to fasten the mounting block to the cabinet bottom panel; the T-nuts would be mounted on the bottom side of the cabinet bottom panel. Check if a Spacer is NeededOn some woofers the surround may be slightly larger in diameter than the hole in the existing cabinet speaker mounting block (5-5/8 inch), the surround may project beyond the mounting plane of the speaker, or (on early WPC games) the speaker may be mounted directly to the cabinet bottom panel. In either of these cases the surround and speaker cone will not be able to move freely due to interference with the mounting block or speaker grille, so you'll need to use a spacer between the speaker and the speaker grille to provide clearance for the surround. If you don't need a spacer continue the section on mounting the woofer. Fabricate a SpacerIf you do need a spacer you can fabricate one from 1/4 inch thick MDF board. The spacer will be 7 inches square, and will have a circular hole cut in the center. The exact size of the hole will be listed in the specification sheet for the woofer that you're using: look for the speaker mounting hole size. Here is a diagram of the spacer we're going to fabricate:
Cut a piece of 1/4 inch thick MDF board 7 inches square. A table saw is the best tool for this job; if you don't have a table saw you can use a portable circular saw. You can also have your local lumber dealer cut some pieces of MDF board to size for you. MDF board is relatively inexpensive, and it usually costs an extra quarter or fifty cents per cut for the lumber dealer to cut the MDF board to size. Use the diagonal line method described above to locate the exact center of the spacer. Make marks on each diagonal line 3-3/32 inch from the center of the square (four marks total). Consult the speaker specification sheet for the speaker mounting hole size; if it's not listed simply measure across the outside edges of the speaker cone surround. For reference, 5-5/8 inches diameter is a common mounting hole size for a 6-1/2 inch woofer. If you're using a circle cutter adjust it for the proper size cutout. Be sure to securely clamp the MDF board to the table of the drill press before starting the drill press! Position the pilot bit where the two diagonal lines intersect and slowly advance the circle cutter until it has cut through the entire thickness of the board. Stop as soon as the cutout section of MDF board starts to spin around with the circle cutter bit.
Note: You may want to use a 1/4 inch brad-point drill bit to make a pilot hole before using the circle cutter; the pilot bit on the circle cutter is a standard drill bit that is a little tough to align exactly even with the center lines on the template. The completed spacer should look like this:
Mount the WooferReplace the plastic speaker grille if you removed it. If your woofer requires a spacer that is placed over the speaker mounting hardware. Lower the new woofer into place, install the appropriate mounting hardware, and carefully tighten the nuts until the new woofer is held firmly in place. Don't over-tighten the mounting hardware!
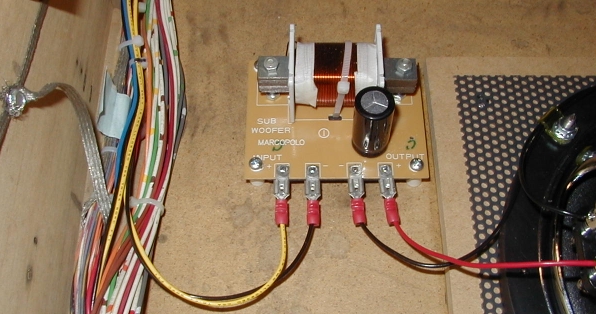
Mount the Crossover or InductorIf you are using a crossover or inductor with the cabinet speaker it can be mounted to the bottom panel of the cabinet in the general vicinity of the cabinet speaker. A good location is between the cabinet speaker mounting block and the left wall of the cabinet; that area is generally free of wires or other obstructions. This picture shows the Pyramid CR-19 crossover mounted as described:
If you'd like you can use some short plastic spacers to raise the crossover a slight distance above the cabinet bottom panel. You can use Williams part number 03-8022-1 spacers (available from Bay Area Amusements) or Keystone model 8837 spacers. In either case you'll have to enlarge the four mounting holes in the corners of the crossover. Inductors with an "air core" (no spool or bobbin) can be mounted using PVC electrical conduit clamps; clamps sized for 1-1/2 inch conduit would generally work out, but that depends on the physical size of the inductor. Don't use metal clamps to mount the inductor; that can damage the insulation on the wire. An inductor with a spool or bobbin can generally be mounted via a dowel and screw sized to fit the inside diameter of the spool.
NEXT: wiring replacement speakers HOME: WPC speaker replacement
Copyright © 2005 by Joseph A. Dziedzic. All rights reserved. |